Moment App - Is This The Best iPhone Photography Application?
/Let's admit it, smartphones have revolutionised digital photography. Nowadays, everyone can take great photos.
Smartphone companies have invested a lot in their hardwares and softwares to make photography accessible to everyone. No need to have expensive camera gear to get similar results, if not better results sometimes.
But to be able to get great results you need to learn how to use your smartphone camera and some photography basics.
If you are just getting started, I'd encourage you to get your free copy of my ebook where I break down my 3 steps approach to mobile photography.
There are also many websites to learn photography from that I already talked about in a previous blog post. That is how I personally did it.
But today technology has allowed us to make things easier for you to learn photography.
Introducing Moment app.
Moment is a camera application that works on Android and iPhone. it is very user-friendly and allows you to use the manual settings of your smartphone camera like you would use on a normal camera. With this application you can do a various range of things among which:
Time-lapses
Record videos
Photos
Long exposure photography
So, if you do not want to invest into an expensive DSLR this would be the perfect workaround for you to learn manual photography and film-making without breaking the bank. The application is available for $4,99 on the app store.
Let's start with photography
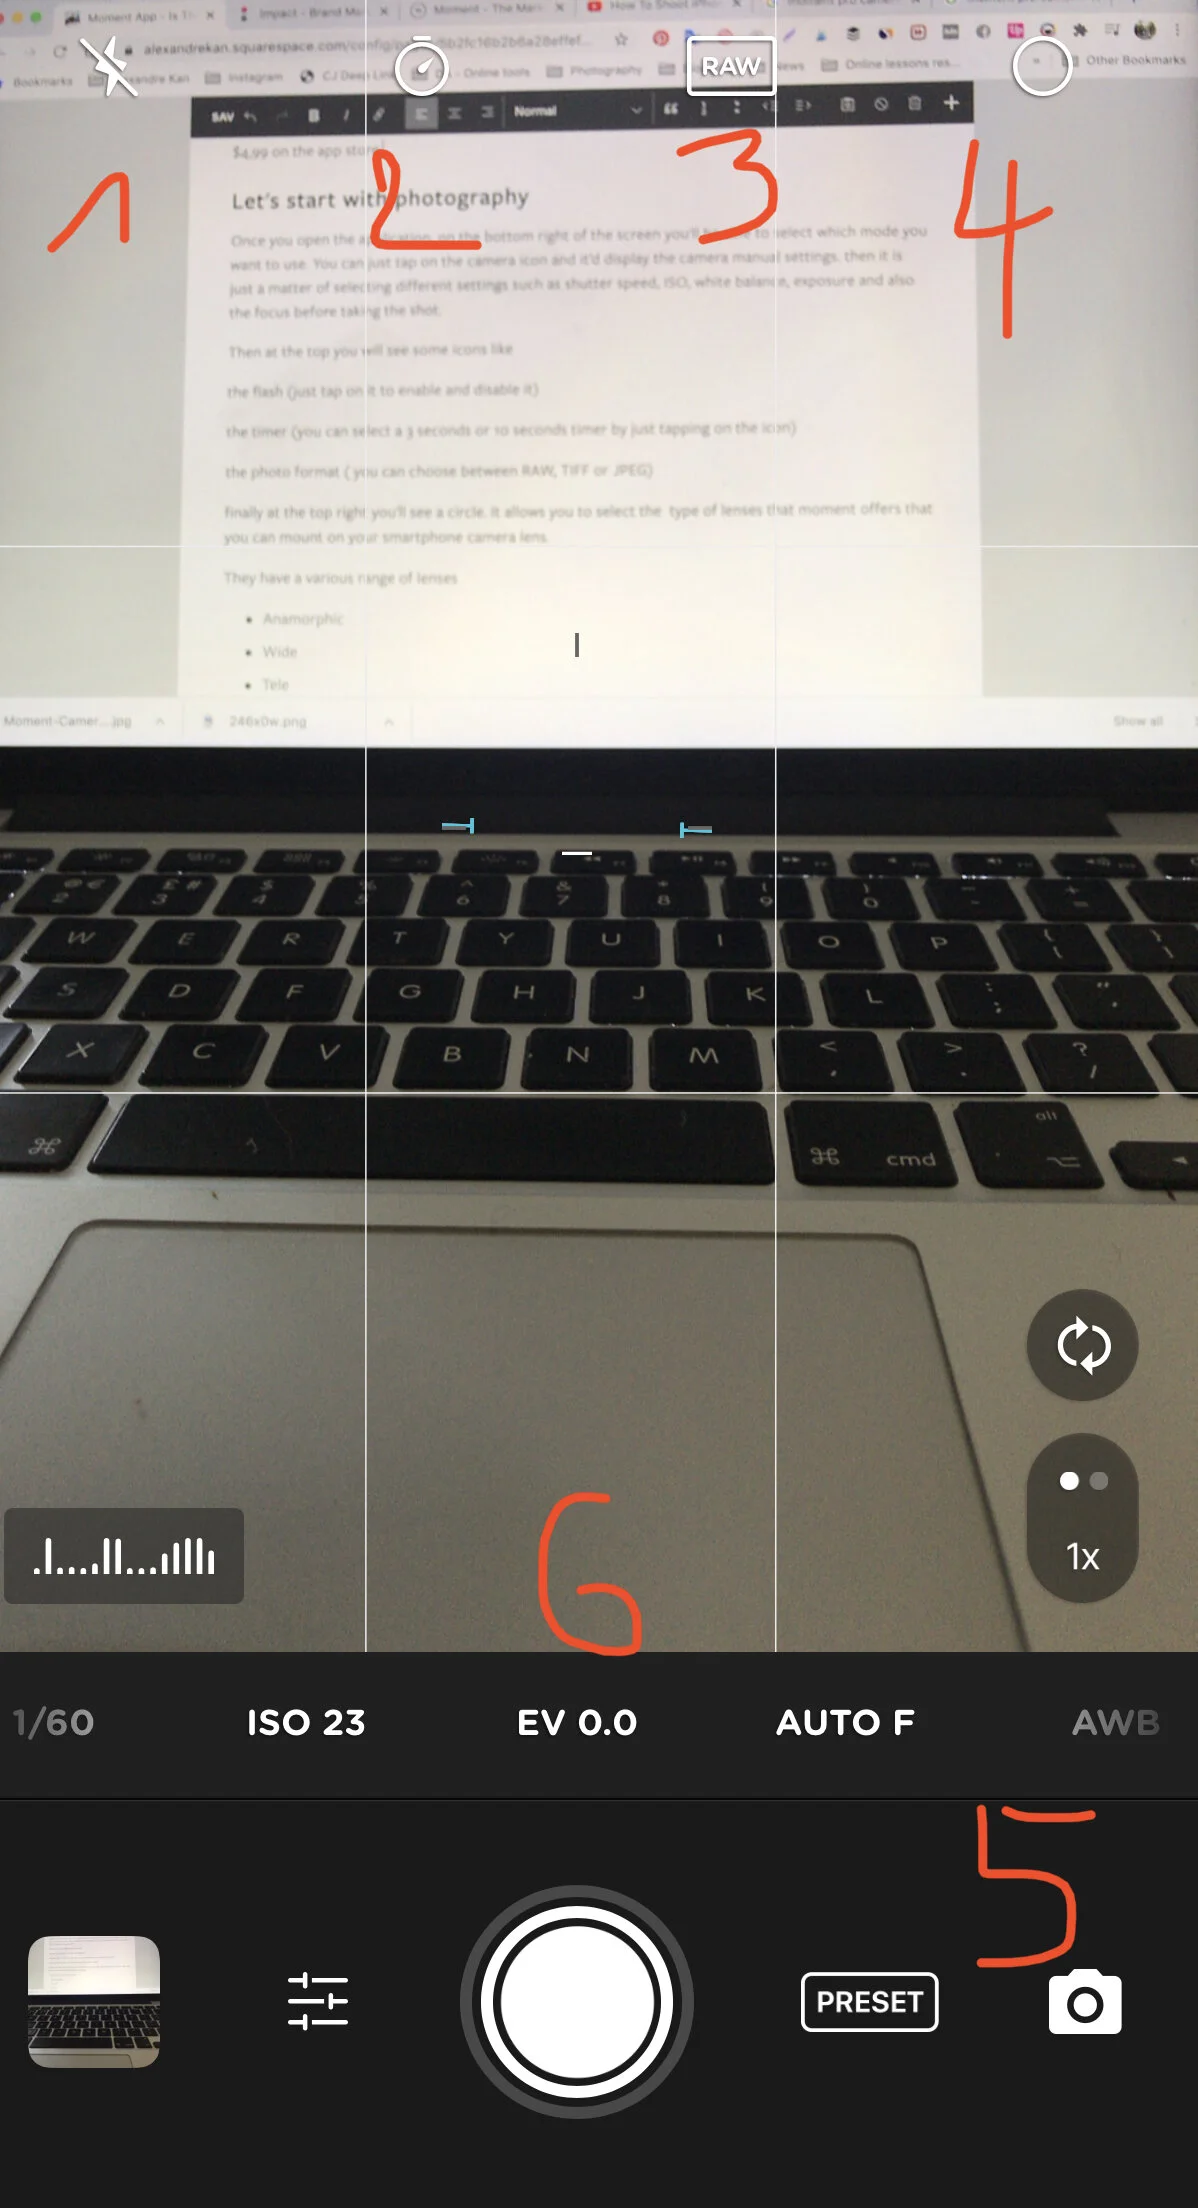
Once you open the application, on the bottom right of the screen you'll be able to select which mode you want to use (5). You can just tap on the camera icon and it’d display the camera manual settings. then it is just a matter of selecting different settings such as shutter speed, ISO, white balance, exposure and also the focus before taking the shot. (6)
Then at the top you will see some icons like
the flash (just tap on it to enable and disable it)
the timer (you can select a 3 seconds or 10 seconds timer by just tapping on the icon)
the photo format ( you can choose between RAW, TIFF or JPEG)
finally at the top right you'll see a circle. It allows you to select the type of lenses that moment offers that you can mount on your smartphone camera lens.
They offer a various range of lenses to add on top of your smartphone camera lens:
Anamorphic
Wide
Tele
Macro
Fish eye
One of the features I like the most is that once you select a setting, it will be locked automatically. If you would like to unlock it, you can just double tap on the blue box. This is ideal if you are focusing on a specific object and you want the brightness to remain the same on all your photos without having to do it for every single photo.
Then we have the time-lapses
A time-lapse is a series of photos that will create a motion picture. Normally, to shoot a time-lapse you’d need an intervalometer. It is an external tool that allows you to take photos at a specific time interval. but if you use the Moment pro camera application, that tool is integrated within the app.
Meaning that you just have to select the number of frames that you want to shoot and the time interval to create your time-lapse.
For instance, if you'd like to shoot a 3 seconds video and edit it on a 24 frames per second timeline, you’d need to shoot 24 time 3, equal 72 photos, to create your timelapse video, then it is up to you to select the time interval. Here are some guidelines:
1 second Moving traffic, Fast moving clouds
1- 3 seconds Sunsets, Sunrises, Slower moving clouds, Crowds, Moon and sun near horizon (or telephoto)
15 – 30 seconds Sun across sky (no clouds) (wide), Stars (15 – 60 seconds)
Longer Fast growing plants (ex vines) (90 – 120 seconds), Construction projects (5min – 15min)
If you’d like to learn more about time-lapses, you can follow @matjoez on Instagram and YouTube. I learned everything I know about it from him and that’s his full-time job. He’s a time-lapse photographer.
You can also select the format of photos that you want to shoot at, JPG or or TIFF.
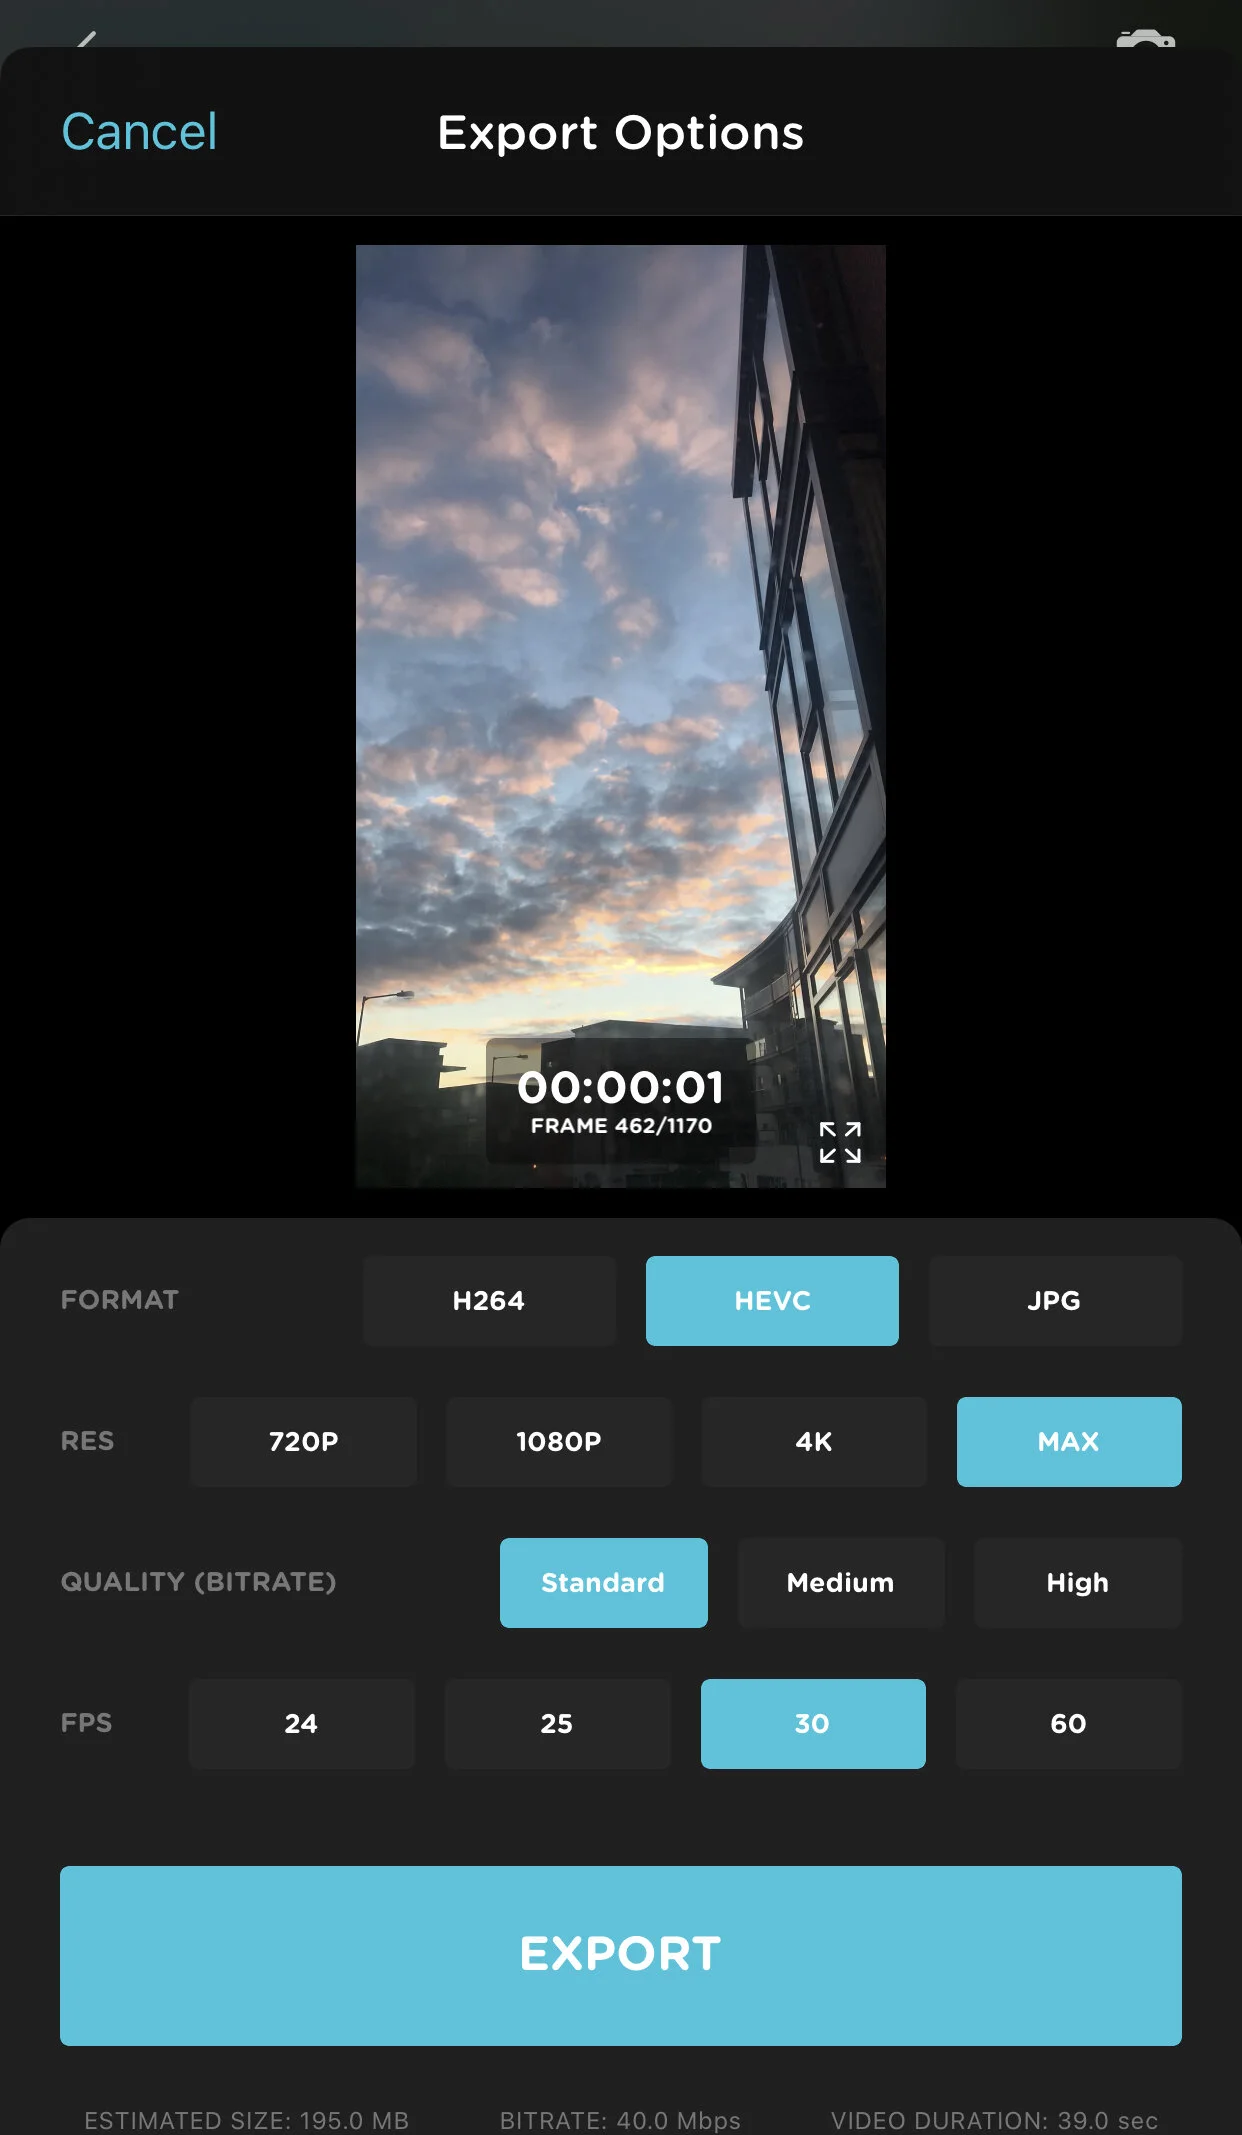
With this application now you have two options to export your time-lapse: You can decide to export the photos as a video.
Select the format that you want your video to be either h264, HEVC or Jpeg to just collect all the photos that you took and edit them using a third party software like Final Cut Pro X or Adobe Premiere Pro.
But, if you would like to export your video directly on your phone you just have to select the format H264 and set the resolution that you want.
You can select from 720 p, 1080p, 4K and Max resolution.
You can see the quality in bitrates and finally the frame per second 24, 25, 30 and 60.
Once selected you can just tap on the export button to create your time-lapse video.
With this setting you can also select two effects: one that is a light trail and the other one motion Blur.
So, light trail is ideal when you are shooting at night and you would like to capture the car lights in motion. And motion blur is great to show some motion. It is ideal to use to create some hyperlapses (motion time-lapse) for instance.
Then you have the video mode
Just like the camera in photography mode it will allow you to shoot your video using the manual settings (shutter speed, ISO, exposure, focus and white balance)
You can select the picture profile that you want to shoot at
Flat
Log
Default
You can select the video quality ranging from 720p to 1080p and 4k resolution.
You can select the frame rate 24, 50ps, 25fps, 30fps and 60fps
Note that the Max resolution you can shoot at will be 4K 30 fps.
Finally the last feature is called slow shutter.
It does what it says. You can shoot long exposure photos using this feature. and you can select from 2 effects
Motion Blur
Light Trails
By sliding your finger left to right you can pick the time of your exposure from 0.5 seconds to Bulb, meaning that you control the time that you want the shutter of your camera remains open.
And that's about it!
As you can see, this application is ideal if you like to get more out of your smartphone camera. It is more for advanced photographers and for people who are willing to learn how to shoot better cinematic videos.
It is a good entry level application to learn the basics of photography and videography without having to invest into an expensive DSLR camera.
If you would like to learn more about Moment, they have a YouTube channel where they share best mobile phone photography and film-making tips and their latest products release.
They also offer online lessons given by very popular photographers and videographers.
If there is one source of information regarding mobile photography and mobile film-making I could advise to anyone, that’d be Moment.
I hope that you found this article helpful. As always if you like it do not hesitate to like this post, it actually makes a difference and if you know anyone else that’d be interested in learning more about mobile photography and mobile film-making, do not hesitate to share this article with them
Finally, if you’d like to receive more articles like this one straight in your inbox make sure to subscribe to my newsletter via the form below.


